Pre-Semester Checklist
In preparation for a new semester the SDCCD Online Learning Pathways have provided a comprehensive checklist to assist our faculty as they prepare their online courses and ensure the best learning environments for our students. For any questions or assistance, please reach out to the Online Learning Pathways Instructional Design Supervisor, Liesl Boswell ([email protected]).
These four Steps will provide the best framework for success for your online courses.
Step 1: Where do I start?
These are the first steps to get oriented and set the stage for preparing your course.
One of the core tenets of Online Learning Pathways is our continuous recommendation to develop your course content in a Canvas development shell. If you follow this practice, you will also know that we always advise copying content from a development shell to the new semester shell in preparation for a new semester.
Helpful Key terms
-
Official Teaching Course: Courses that have students pre-loaded (automatically generated from PeopleSoft/Campus Solutions/MySDCCD)
-
Development Shell: Course that does not have students (manually created course that is not tied to PeopleSoft/Campus Solutions/MySDCCD)
Why Use a Development Shell?
Recognizing the complexities involved in transferring course content from one shell to another is crucial. This is why we recommend using a development shell for this process.
Key Benefits:
- Streamlined Content Transfer: Simplifies the migration of course materials.
- Consistency: Ensures that your course content remains uniform across semesters.
- Preparation: Allows you to make updates and improvements before the new semester begins.
The following Canvas Community guide will provide detailed instructions on how to copy content over from a Canvas Development Shell or a previous semester course into the upcoming semester course shell.
How do I copy content from another Canvas course using the Course Import tool?
When Will Official Canvas Shells Be Available for Next Semester?
- Once the upcoming semester schedule has been finalized (usually one month prior), official course shells along with enrollments will be automatically generated, when data from Campus Solutions is transferred to Canvas.
- The completion of the final schedule in Campus Solutions varies from semester to semester. Announcements will be sent as soon as the official course shells become available in Canvas. If you would like to start developing your course content now, it is highly recommended that you request a Canvas Development Shell through the Canvas Help Button (either use Chat or call). This allows you to create and organize your course materials in advance, and then easily copy everything over to your official course shell once it becomes available.
Steps to Request a Single Canvas Development Shell
Canvas Faculty Support will only create one Canvas Development Shell per request due to high demand.
- Call Canvas Faculty Support at 1-844-612-7422.
-
During the verification process, state you are from the San Diego Community College District.
-
Provide your SDCCD 10-Digit Employee ID.
-
Request a "Canvas Development Shell."
Steps to Request Multiple Canvas Development Shells
If a faculty member needs multiple Development Shells for different subjects in a semester, they should visit the MySDCCD Faculty Support Desk at facultyhelp.mysdccd.info.
- Visit the MySDCCD Faculty Support Desk at facultyhelp.mysdccd.info.
-
Fill out the initial form details.
-
Select Online Learning Support as the Help Topic.
-
Choose Development Shell Request as the Issue Type.
-
Fill out the Canvas Development Shell Request form.
-
Submit the form.
Online Learning Pathways will aim to process the request within one business day. Otherwise, you will receive an update on your ticket status within one business day.
Cross-Listing/Merging Introduction
Cross-listing is used when an instructor teaches more than one section of the same course. For example, if you are given two sections of ENG-120 to teach and you want to combine the enrollments for both sections into one Canvas course, you only have to make changes and teach out of one Canvas course container. The merged courses will have the same content such as having the same pages, assessments, and announcements
You can show specific content by sections.
It is extremely important that cross-listing is done BEFORE you begin preparing your courses for the semester.
Resources
Cross-Listing Requirements
Important: Faculty members should adhere to the following requirements for properly cross-listing two or more courses.
- Timing: It is highly recommended that cross-listing requests be submitted at the beginning of the semester. Cross-listing requests must be promptly submitted once the semester Canvas course shells are created for that specific term.
- Empty Course Shells: The parent and child sections of the courses to be cross-listed must be empty. There should be no course content, student activity, or grades in these sections.
- Loss of Work: If a faculty member submits a cross-listing request and the course shells are not empty, any existing content, student activity, or grades in those shells will be lost in the cross-listing process. Therefore, it is crucial that parent and child course shells are empty at the time of cross-listing.
Instructions for Submitting a Cross-List Request
To cross-list one parent and one child Canvas course shell, contact Canvas Faculty Support for assistance.
Process for Cross-Listing
- Prepare Information: Prepare a list of the 5-digit course numbers you would like to cross-list. Specify which one is the parent shell (the course shell you intend to teach out of) and which is the child shell.
- Contact Support:
- Call Canvas Faculty Support at 1-844-612-7422.
- During the verification process, state that you are from the San Diego Community College District.
- Provide your 10-Digit Employee ID.
- Provide the five-digit course numbers that you would like to cross-list, specifying which is the parent shell and which is the child shell.
For Multiple Cross-List Requests
- To cross-list multiple child courses into one parent shell, visit the MySDCCD Faculty Support Desk.
- Fill out the initial information, select "Online Learning Support Canvas" under Help Topic, choose "Cross-List Request" for the issue type, and complete the cross-list request form.
- Online Learning Pathways will aim to process the request within one business day. Faculty will receive updates on their ticket status promptly.
Read the FERPA Compliance And Student Interaction In Merged Canvas Course Sections.
Grading Scheme tells Canvas how you want percentages turned into letter grades in your course. If you do not check this box, students will see a percentage rather than a letter grade when they view their grades.
If you do check this box, be sure to select a different grade scheme than the first one that shows up because it might not match the grading scheme you have specified within your syllabus.
Let Canvas automate grade calculations for you by simply setting the grading scheme for your course.
Learn how to implement grade weights via How do I weight the final course grade based on assignment groups?
If you plan to provide extra credit, learn how to setup these type of assignments by viewing How do I give extra credit?
Properly Set-Up Your Gradebook
When setting up a new course shell for a new semester in Canvas, it is crucial to follow best practices to ensure a smooth and efficient grading process throughout the semester. Here are some key steps and best practices for the initial setup of your grade book:
Initial Setup Steps
- Create Assignment Groups
- Purpose: Create specific groups for assignments, quizzes, or discussions. Faculty should review all assignments, discussions, and quizzes to ensure relevance to the new semester and clean up anything irrelevant.
- How to: Navigate to the Assignments page, click the "+ Group" button, and create groups for each category. This helps in managing and organizing assignments effectively.
- Set Up Assignment Group Weights (optional)
- Purpose: Ensure that each category contributes appropriately to the final grade based on your syllabus.
- How to: After creating assignment groups, click the three dots next to the group name, select "Assignment Group Weights," and assign the appropriate percentage to each group (e.g., Homework 50%, Exams 25%, Participation 25%).
- Enable a Grading Scheme
- Purpose: Align the grade book with your course's grading policy, converting numerical scores to letter grades if needed.
- How to: Go to Course Settings, scroll down to "Enable course grading scheme," and either use the default scheme or customize it to match your syllabus.
- Set Up Late and Missing Policies
- Purpose: Automate the handling of late and missing submissions to maintain consistency and fairness.
- How to: In Gradebook Settings, navigate to the Late Policies tab and configure automatic deductions for late submissions and default grades for missing assignments.
- Configure Grade Posting Policies
- Purpose: Control when students see their grades and feedback.
- How to: In Gradebook Settings, set the grade posting policy to either automatic or manual, depending on whether you want grades to be visible immediately or after manual review.
- Organize Gradebook Columns
- Purpose: Ensure the grade book is easy to navigate and use.
- How to: Use the drag-and-drop feature to arrange columns in a logical order, resize columns as needed, and use filters to manage the view of the grade book.
- Set Up Filters and Views
- Purpose: Customize the grade book view to suit your needs.
- How to: Use the "View" menu to apply filters, such as by assignment group or module, and set up presets for frequently used views.
Best Practices
- Consistency with Syllabus: Ensure that the grade book setup aligns with the grading policies and structure outlined in your syllabus. This includes assignment weights, grading schemes, and late policies.
- Clear Communication: Clearly communicate grading policies, including how grades will be posted and how late submissions will be handled, to students at the beginning of the semester.
- Regular Updates: Regularly update the grade book with new assignments and grades to keep it current and accurate. This helps students track their progress and stay informed about their performance.
- Utilize Canvas Features: Take advantage of Canvas features such as SpeedGrader for efficient grading, and the Notes column for tracking additional information about student performance.
- Backup and Export: Periodically export the grade book to an Excel file as a backup. This ensures that you have a copy of the grades in case of any technical issues.
By following these steps and best practices, you can set up a robust and efficient grade book in Canvas that will help manage grading throughout the semester effectively.
Additional Resources
- Gradebook Overview (Instructors)
- How to Use the Gradebook
- Applying a Missing Submission Policy
- Applying a Late Submission Policy
- Using the Total Column in the Gradebook
- Arranging Columns in the Gradebook
- Filtering Columns and Rows in the Gradebook
- Using Posting Policies in a Course
- How to add an assignment to a group
How are you welcoming your students into your course? Do you have a picture or video to help students become familiar and comfortable with you?
How are you guiding students' navigation? By the Front Page, do students know how to navigate your course if it's the first time they are entering your course? Help students focus more on learning and less on navigating by setting a welcoming, front page!
Help students focus on what course navigation links are important in your course! Streamline the menu by simplifying the course navigation links.
Creating effective navigation is crucial for the success of your course. You want your students to focus on your coursework rather than spending time trying to navigate your course.
Recommended Course Menu Sections
- Home
- Announcements
- Syllabus
- Modules
- Grades
Sections like Assignments, Pages, Files, and Quizzes are not included in this example. The Modules section should be the single point of entry to your coursework, as having more than one entry can confuse students. By limiting access to the Modules section, you gain greater control over how students navigate your coursework.
There are many settings to choose from and some that are very important that you change. These are our recommendations. To access these settings, go to Settings on the course menu, then make sure the Course Details tab is selected.
- Course Image: If you add an image here it shows on your course card on the Canvas Dashboard. It's a subtle way to make your course stand out. This is optional and not a requirement.
- Start and End Dates: Start and End dates are automatically added via the course schedule that is uploaded to Campus Solutions. Once the course concludes, students will have read-only access to your course for one year.
If you have students that require an Incomplete, please contact OLP via the Faculty Support Desk Form and provide student details. We will create a special section that locks the course so that only you and the student(s) requiring Incomplete have access to your course. - Show Announcements: We recommend you show at least one to three announcements on your course home page. Check this box, then choose the number of announcements you want to display.
- Attach Files: Usually, there is no harm in allowing students to attach files to discussions. However, your needs may vary.
- Students Create Discussions: If you check this box, and we do not recommend this, you will allow students to create their own discussion forums. This can play havoc with your planned discussions in most courses. However, it can be useful if you do not plan discussions and want to allow students to talk about anything they want.
- Edit Discussion Posts: If you check this box, students will be able to delete or edit their discussion posts. Sometimes this is a good thing. Sometimes not. It's your call.
- Organize Groups: If you want to let students organize their own groups, check this box. However, be sure to monitor any groups they create. Student groups have been known to be used to cheat.
- Disable Comments on Announcements: If you check this box students will not be able to leave comments on your announcements. If you do not check this box student will be able to reply to your announcements which means you will have another place to manage communications with your students. However, this another way you can humanize your course.
Save your work by selecting Update Course Details button to save your chosen settings.
Understanding Learning Tools Interoperability (LTI)
A Learning Tools Interoperability (LTI) is a standard developed by the IMS Global Learning Consortium that allows third-party applications to integrate seamlessly with Learning Management Systems (LMS) like Canvas. It enables educators to add rich, interactive content and tools, such as external assignments, quizzes, and multimedia resources, directly within their course environment. This integration enhances the learning experience by providing students with easy access to a variety of educational tools without needing to leave the LMS platform.
Setting Up an LTI
Setting up an LTI can be a complicated process depending on the third-party vendor you are working with. Here are some key recommendations and steps:
- Do not install LTIs in a development shell or copy existing LTIs from a previous semester to a new semester shell: This practice can lead to compatibility issues and errors.
- Migrate only the content you create in your development shell to the new semester shell: Only transfer original course content that you created to maintain consistency and avoid potential conflicts with LTI configurations.
- Set up LTIs directly in your new semester shell: This ensures that all tools and resources are properly configured and function correctly in the new course shell environment.
Requesting an LTI
Implementation Turnaround Time
If you plan to use a new LTI, please provide at least a month for installation as the volume for requests increase prior to the start of a semester. LTI requests require a:
- VPAT (for student accessibility compliance)
- HECVAT (for student security and privacy)
You may need to work with your vendor to obtain these documents. Please submit a Faculty Support Form to request your LTI today.
If you need to request an LTI that is not currently installed within the Canvas system, follow these steps:
- Fill out a Faculty Support Desk ticket at the mySDCCD Service Desk:
- Visit mysdccd.info.
- Fill out the initial details:
- First and last name
- Summary of your request
- Employee ID
- Role with the district
- Under Help Topic, select Online Learning Support Canvas.
- For the type of issue, select Third-Party LTI Integration Request.
- Complete the LTI form.
- Response Time:
- You will receive a response within one business day upon completion of the LTI installation request.
- Alternatively, you will be contacted with updates on the status of your ticket within three business days.
Activating an Existing LTI
If you have any issues activating an existing LTI that has already been installed in the system but needs to be activated within your new semester course, follow these steps:
- Fill out a Faculty Support Desk ticket at the mySDCCD Service Desk:
- Visit mysdccd.info.
- Under the type of issue, select Canvas Support.
- Fill out the details of the related course.
- Describe the issue you are having in trying to implement the LTI into your new semester course shell.
By following these steps, you can ensure a smoother setup and activation process for LTIs within your Canvas courses.
Step 2: How do I Finalize my Course Design?
Build, Refresh, and Organize content for a solid student experience.
Consider placing your Syllabus content on the Syllabus tab. Anytime you need to update content, you can simple Edit the page in lieu of downloading the current version, updating in Word, then uploading in Canvas (and having multiple copies over time!)
You may want to add an Artificial Intelligence (AI) Policy to help guide students on how AI can or cannot be used in your course.
Publishing Content
It is vital that you publish your course before the semester start date to ensure your students have access your course on the first day of class. Please review the following instructions on how to publish your Canvas course.
If you have time to refresh course content, consider reviewing your course. When you feel the content is student-ready, publish your course.
If you need a little bit more time to work on certain modules, consider adding a module date that will open it when it's ready.
Important Notes
- Un-publishing: If you need to un-publish your course, you can click the Un-publish button in the sidebar. However, once your course contains a graded submission, you can no longer un-publish it.
- Student Access: Students will not be able to see or access the course until it is published. Once published, the course will be available according to the term and/or course dates.
By following these steps, you can ensure that your Canvas course is published and accessible to your students.
Scaffold the material into bite-sized chunks for your students. Seeing the course all at once can be overwhelming.
You can set:
There are several Requirement Types. You can choose from several options for what students must do to complete each item in the module
- View the item: Students must view the item.
- Mark as done: Students must mark the assignment or page as done.
- Contribute to the page: Students must post a reply to a non-graded discussion or contribute content to a page.
- Submit the assignment: Students must submit an assignment, post a reply to a graded discussion, or submit a quiz.
- Score at least: Students must meet a minimum submission score.
You can Set Completion Requirements by choosing whether students must complete all of the requirements or just one of them. Additionally, you can specify if students must complete the requirements in sequential order.
Example Scenarios
- Least Restrictive:
- Students can track their progress without being locked into a sequence.
- Set up: Select "Students must complete all of these requirements" without adding prerequisites.
- Moderately Restrictive:
- Students must complete one unit before moving to the next.
- Set up: Add requirements to the module and then set the preceding module as a prerequisite for the next module.
- Most Restrictive:
- Students must complete items in a specific order and master concepts before moving on.
- Set up: Select "Students must complete all of these requirements in sequential order" and add the preceding module as a prerequisite.
By following these steps, you can effectively guide students through your course content in the desired sequence and ensure they meet specific learning objectives before progressing.
Using PopeTech to Improve Course Accessibility
In accordance with federal law (Americans with Disabilities Act, Sections 504 & 508 of the Rehabilitation Act) and District policy, all instructional materials must be created and delivered in a manner that is accessible to all students, including those with disabilities.
To support you in creating an accessible course we have enhanced Canvas with PopeTech, a tool that helps you find and fix accessibility issues in your course content. To make this process easier, the "All Courses" page now includes an "Accessibility" column that provides an at-a-glance summary of your course's accessibility.
The New "Accessibility" Column
On your "All Courses" page, the Accessibility column lists the total number of errors and alerts for each course. These numbers represent items you will want to correct or review to ensure an accessible experience for all students.
How to Use the Accessibility Dashboard
- Select a Value: Click on the number in the Accessibility column for a course.
- View the Dashboard: You will be taken to the PopeTech Accessibility Dashboard, which provides a comprehensive list of all issues within that entire course.
Prioritizing and Fixing Issues
The dashboard helps you prioritize what to fix first. You can edit any item directly from the dashboard.
- Errors (Red X): These are your top priority. Errors represent significant accessibility barriers that fail to meet WCAG standards.
- Alerts (Yellow !): These are your second priority. Alerts are potential issues that require your manual review to determine if a correction is needed.
To fix an issue, simply click the Edit icon next to it in the dashboard. This will take you directly to the specific Canvas page, assignment, or discussion so you can make the necessary edits.
Need More Information?
For detailed guides on what specific errors and alerts mean and step-by-step instructions on how to fix them, please visit the DE Toolkit Accessibility Guide, and the SDCCD Accessibility Resource Hub for even more information on accessible design.
Step 3: Is your course ready for Students?
Make sure your assessments and interactions are student-friendly and ready to go.
Canvas is great in facilitating timed communication and scaffolding assignments. Set dates for:
Use the Calendar, Course Summary under the Syllabus section, or Assignments page to check if due dates are correct.
To ensure that your assignments, quizzes, and discussions are ready for the new semester in Canvas, follow these best practices.
Assignments
Bulk Edit Due Dates and Availability
- Use the "Edit Assignment Dates" feature to quickly update due dates and availability dates for multiple assignments at once.
- Double-check dates in the Assignments or Modules sections after bulk editing.
- Verify assignment groups for accurate weighted totals.
Update Assignment Details
- Review and update each assignment's title, description, due dates, and point values.
- Make necessary changes and save updates.
Best Practices for Migrating Quizzes
- Review and Update Quiz Content: Verify that questions, answers, embedded media, and links are accurate and functional.
- Consistency in Quiz Settings: Set correct availability dates and times. Adjust time limits and the number of attempts to match course requirements.
- Ensure Proper Quiz Placement: Place quizzes in appropriate modules and assignment groups. Verify points and weighting for overall grade calculation.
- Preview and Test Quizzes: Use Student View to preview quizzes from a student’s perspective. Conduct test runs to ensure all functionalities work as expected.
- Communicate with Students: Provide clear instructions and guidelines for taking quizzes. Use course announcements to inform students about quiz schedules and details.
- Backup and Documentation: Export quizzes as QTI files for backup. Document changes for future reference.
- Technical Support and Resources: Refer to Canvas guides and resources for detailed instructions. Contact your institution’s Canvas support team for technical assistance.
Best Practices for Migrating Discussions
- Carrying Over Discussions: Manually update discussion dates and settings after import. Avoid duplicates by selecting specific content during the copy process.
- Review and Edit: After copying, review the discussion in the new course to ensure all content, including images and files, has been transferred correctly. Make any necessary adjustments to the discussion prompt or settings
General Best Practices
Comprehensive Review: Conduct a comprehensive review to ensure all assignments, quizzes, and discussions are valid and relevant to the new semester. Remove any unnecessary items to clean up the course content.
Use a Development Shell: Build and test assessments in a development shell before importing them into the official course.
Student View: Use the Student View feature to ensure everything functions as expected from the student's perspective.
Accessibility and Communication: Check the accessibility of your content using Canvas’s built-in Accessibility Checker or the Pope Tech Accessibility Checker. Communicate frequently with students about assessments and tools used.
By following these best practices, you can ensure that your assignments, quizzes, and discussions are current and ready for the new semester in Canvas.
Additional Resources
Save yourself time and student heartache by double-checking the Student View first before you publish your course!
Find broken links by using the Validate Links tool.
Turn on Canvas notification alerts for bad links to stay informed about any issues.
Be careful to read the guidance alert for each listed link - not all links are broken!
There are several types of error links:
- External links in this resource were unreachable
(This means...these are broken links!) - Links to other courses in this resource may not be accessible by the students in this course
(This means...these are links that go to other Canvas courses that may be private or unpublished) - Non-existent content referenced in this resource
(This means...these are either Canvas pages, quizzes, assignments, announcements, or modules that have been deleted!)
Step 4: A Couple of Weeks Prior to Course Start Date
Send a welcome letter to help orient students to your course by letting them know:
- When the course begins
- The link to your course
- What course participation looks like
- the first week of class and throughout course
- when you need them to login by
View a Welcome Letter sample.
Before modifying your courses in Canvas, please make sure that you are still teaching the course in mySDCCD portal. Also make sure that the enrollment roster is correct under the "People" section within Canvas. Unfortunately scheduling mistakes do happen. It's important to discover these mistakes as early as possible before the new semester begins. Here are the steps needed to verify your roster is correct from within your Canvas course shell.
- Log into your Canvas account. Open up your official course shell and click on People. The next step is to verify that the correct instructor of record has been enrolled into the course.
- While in the People Section, click on the "All Roles" drop-down menu and select "Teacher".
-
Review the list and verify that the instructor of record is correct. The final step is to verify that the correct section has been enrolled into your official Canvas course shell
- Refer to the "Section" column and verify that the five-digit course number matches the 5-digit course number of the course you are teaching. If these numbers do not match, this means that a different section has been enrolled into your course.
If you notice any mistakes in your roster, you will need to fill out a MySDCCD Help Desk support ticket for further assistance. These errors need to be resolved Campus Solutions before it can be resolved in Canvas.
Need a bit more time to prepare your course content before the semester begins, but still want to welcome your students or share your syllabus?
In your course settings, under Course Details and Visibility, you have the option to share your syllabus with students even if the rest of the course content isn't ready. This allows you to provide key information while you continue updating your course materials.
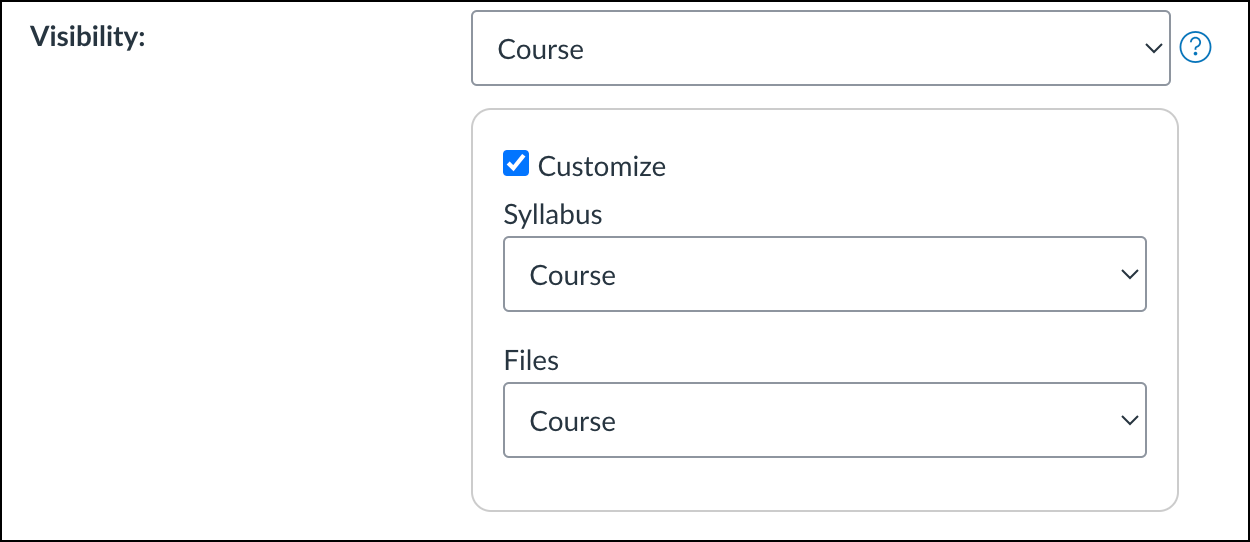
Share just your syllabus:
- Ensure your course is Published.
You may unpublish any modules at this point, though we recommend publishing a friendly home page/front page. - In your course, select Settings and then Course Details.
- Under Visibility, select Customize.
- Under Syllabus, select Course.
Note:
You may set visibility to three different levels:
- Course
All users associated with this course - Institution
All users associated with this institution - Public
Anyone with the URL
Announcements and Inbox conversations are NOT sent if the course is unpublished.
If you want to send an announcement to your students before publishing the course, you can send an email through the MySDCCD Portal.
Please provide instructions for your students on how to get started with Canvas. Many of your students may not have used Canvas before. To help them, send an announcement that includes a link to the SDCCD Online Learning Pathways Student Support page.
Help
If you need immediate assistance in setting up your Canvas course we recommend you contact the 24/7 Canvas Faculty Support line for assistance at 1-844-612-7422.
Otherwise, feel free to contact us the SDCCD Online Learning Pathways Department for additional assistance. Make sure to include all of us on your email inquiry for the best response time.
- Brian Weston, Dean, Online & Distributed Learning: [email protected]
- Liesl Boswell, Instructional Designer Supervisor, Online Learning Pathways: [email protected]